Being productive in tmux with minimal setup
Quick introduction to the tmux tool and how to start using it's basic features.
If ssh-ing into machines is a part of your daily routine, and/or if you think you spend too much time opening new terminal windows and trying to fit them nicely on your screen - oh boy do I have a tool for you.
If you are anything like me, you’ve heard of tmux and have a vague idea of what’s it used for, but never really got around to sitting down to understand if you need it and how to use it. Here I’ll try to give exactly that information - minimal amount of knowledge you need to start getting your hands dirty with tmux.
What is tmux#
Tmux is an open source terminal multiplexer tool. It lets you create a “virtual” terminal session in your preferred terminal emulator. What you really need to know about it in practice though, is it’s two most useful features that streamline working with multiple terminal sessions:
- Each new terminal session started with tmux can be detached from and later reattached to (allowing you to, for example, have terminal sessions for long running processes that you want to shelve for later)
- It lets you have multiple tabs/panes in a single terminal session (no more opening multiple terminal windows and manually fitting them on your screen)
Installation#
Let’s go over a minimal setup you need to start using tmux.
First let’s install it, e.g. on a debian based OS:
sudo apt install tmuxAnd that’s it. That’s all you need to use tmux ;)
Extra setup steps to make vim users’ life easier#
If you’re comfortable and used to vim keybindings, here’s a change in the config to port vim bindings to the most used tmux commands:
Note: even if you’re not, these are IMO much easier to use than the default bindings + after using them for a while, you’ll be halfway there to being comfortable with vim bindings in general.
# In ~/.tmux.conf

# Binds movement between panes to vim's hjkl keys
bind h select-pane -L
bind j select-pane -D
bind k select-pane -U
bind l select-pane -R

# Unbind default split bindings
unbind '"'
unbind %

# Split horizontally with h
bind n split-window -v

# Split vertically with v
bind m split-window -hBasic concepts#
Sessions, windows, panes#
In tmux, everything starts with a session - a long-lived workspace that survives network disconnects and lets you resume your work where you left off. In essence, session is what you get when you type tmux in your terminal - you’ll know you’re in one by seeing a tmux status bar appear on the bottom of your terminal emulator screen.
You can organize the session into windows, each functioning like a separate terminal tab (but within the same tmux instance). Windows can then be further split into panes, dividing the screen vertically or horizontally, so that you can run and view different commands side by side.
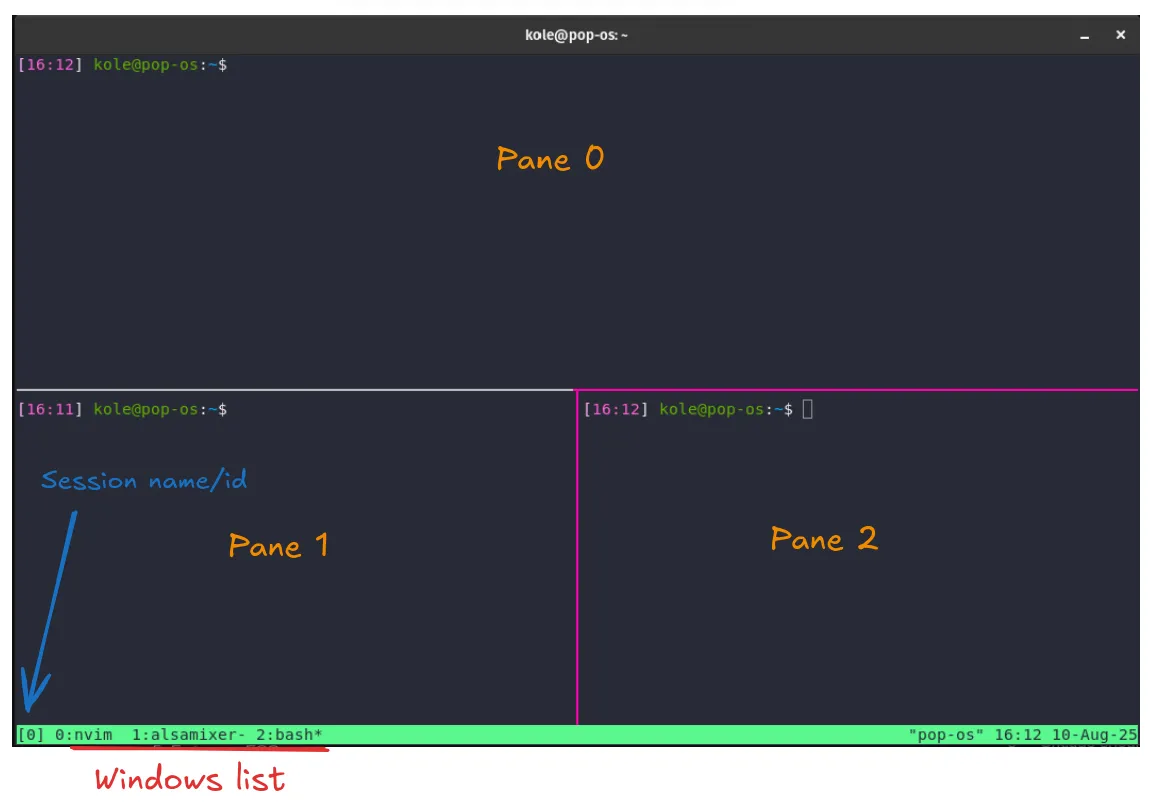
In this example of a single tmux session (by default named “0”), I have 3 windows opened, as you can see in the status bar on the bottom. In the current window we are seeing (window 2, we know which windows is the one being shown by looking at the status bar and looking for the window name that’s followed by an asterix *), I have 3 panes opened. A quick glance at the status bar will also show you which process is the focused one in another window, next to the window name (by default an incrementing integer, although you can name windows when creating them if you prefer that), so it’s easy to have an overview of what’s happening in which of the open windows.
However, I don’t use windows as often, as for my use cases, panes usually get the job done. If your workflow is anything like: 1. ssh into your dev machine, 2. do some work in it, 3. trigger some builds, check some logs, having 3-4 panes opened might do the job for you as well.
Status bar#
In a default setup, status bar is split into three parts: left section, right section and the central window list. Sections can be configured to show outputs of bash commands, but defaults are already quite useful on their own:
- left-section is set up to show current session name (in config,
[#S]) - right section is set up to show pane title, time and date (in config,
" "#{=21:pane_title}" %H:%M %d-%b-%y") - center section lists all windows with the current window having an asterix next to it’s name
Basic usage#
Start an unnamed tmux session:
tmuxNote: you can start a named session with
tmux new -s <name>so that you can later detach and attach to it by name instead of an index, liketmux attach -t <name>.
As a reminder, you’ll know you are inside a tmux session because you’ll see a status bar on the bottom of the screen. It displays helpful information relating to the current session, as well as general system information such as time and date.
If you haven’t changed any keybindings or settings, your default “prefix” key will be CTRL+B. In order to use any tmux keybindings, you first need to press your prefix key combination. You can then experiment with default keybindings to navigate around tmux and create a workspace that works for you.
Navigation, opening windows and panes#
To get you started, here are the most useful keybindings for navigation and workspace setup, which likely covers a vast majority of your tmux beginner use cases:
# Window management
## Open new window
Prexif + c

## Close current window
Prefix + &

## Switch to next window
Prefix + n

## Switch to previous window
Prefix + p

# Panes management
## Split horizontally
Prefix + "

## Split vertically
Prefix + %

## Switch to next pane
Prefix + o

## Switch to previous pane
Prefix + {

## Close focused pane
Prefix + xNote: IMO, you can even completely ignore tmux windows and still get a lot of value out of just panes on a fewer number of keybindings you need to remember.
Scrollback and search#
If you need to scroll back in the pane, you can enter the scrollback mode by using the default keybind:
Prefix + [After you enter this mode, by default you can use emacs-style keys to navigate the pane (e.g. arrow keys + q/Esc to exit). To search, you can use ctrl-s or ctrl-r for backwards search. Or, if you prefer vim-style bidings, you can set that up in tmux.conf (shown at the end of the post in the section of my setup).
To maximize the pane which helps with parsing the scrollback buffer, do:
Prefix + zAnd the same to zoom back to your previous view.
Broadcasting to all panes#
Broadcast mode allows you to simultaneously type in all open panes. I’m sure you can think of bunch of use cases for this, but the most common one for me is ssh-ing into my dev machine in all my open panes at the same time without having to retype the ssh command and my private key’s password.
By default, there is no single keybind for broadcast mode (which is honestly, insane), so if you don’t want to add it to your ~/.tmux.conf file (which really, you should), you can enter the broadcast mode like this:
# Start broadcast mode
Prefix + : # then type # setw synchronize-panes on

# Stop broadcast mode
Prefix + : # then type # setw synchronize-panes offOr, make your life easier right away by adding the following to your ~/.tmux.conf:
bind b setw synchronize-panesAnd just do Prefix + b to start/stop the broadcast mode.
Session management (attaching/detaching)#
As soon as you start tmux, you have started an unnamed session that you can detach from/attach to. Unnamed sessions can be identified by using incrementing integers, starting at 0. However, to make things easier for you, you can also pass some arguments to the tmux command in order to give your session a name (in practice though, I rarely do this unless I know I will have to shelve my session, since for my regular workflow, identifying a couple of sessions that I have by 0 an 1 is simple enough).
# Starting a tmux session named "dev1"
tmux new -s dev1Then, while you are in this session, you can always detach from it:
Prefix + dThis will leave the session (and all the processes started in this session, including ssh) running in the background, while bringing you back to your original terminal.
You can then list active sessions:
tmux lsOr even from inside one of the sessions:
# This will also let you switch to another session
Prefix + sIf you want to attach to a session you have previously detached from, do:
tmux attach -t dev1Or if you want to kill a detached session:
tmux kill-session -t dev1How I use tmux#
If you ‘re still unsure whether this could be useful to you, here I’ll give a quick overview of how I use tmux daily so you can see if your workflow looks anything like it.
Since I do most of my work at my job on a cloud machine instead of my physical one, I constantly need to be ssh-ed into it. At the start of my day, I open a tmux session, split it into 4 panes and use this session rest of the day for development. Ssh-ing into all the panes I have open is quick via the broadcast mode, and I often need to do this multiple times a day, e.g. when my ssh connection times out after a break, or if I need to switch to a beefier cloud machine. While working, I often use the scrollback mode to inspect build output, or search through logs. Opening a scrollback mode in vim helps me search through the logs quickly.
I have configured tmux to open a new temporary file in neovim when starting the scrollback mode, so I can use my neovim plugins to quickly search and navigate around log files, and then easily edit/save the terminal history into a new permanent file if I need to (for config info, check the exceprt of my config at the end of the post).
Finally, I use the session attach/detach feature to start long running builds and come back to them later, or if I need to be sshed into mulitple machines at the same time. I also use separate sessions when I, for example, work on different projects at the same time. This way I can switch context easily without having to reopen all my terminals, in-terminal-editors and set up layouts.
For all of this, you need to remember around 10 keybindings, most of which can be mapped to vim equivalents.
My config#
Here’s my annotated config that uses vim-like keybindings and rebinds some of the other basic features that I find the default keybindings atrocious for:
# ~/.tmux.conf

# You can use tmux plugins. This one lets me save a workspace state (e.g. which windows/panes I have open) and lets me reopen them on a keybind
set -g @plugin 'tmux-plugins/tmux-resurrect'

# For my prefix I like to use ALT+SHIFT, as that'd be CMD+SHIFT on a mac which is my work laptop. However, my terminal of choice (Kitty) can't send Alt+shift combo, so here I tell tmux that it should expect a ctrl+a prefix, that kitty will send on alt+shift based on my `kitty.conf`
unbind C-b
set -g prefix C-a

# Bing moving around panes with Vim's hjkl keys
bind h select-pane -L
bind j select-pane -D
bind k select-pane -U
bind l select-pane -R

# Unbind default split bindings, honestly, they are horrible
unbind '"'
unbind %

# Split horizontally with n
bind n split-window -v

# Split vertically with m
bind m split-window -h

# Create a new window
bind-key p new-window

# Move to previous window
bind-key i previous-window

# Move to next window
bind-key o next-window

# Start broadcast mode
bind b setw synchronize-panes

# Bind save from tmux-ressurect
set -g @resurrect-save 's'
# Bind restore from tmux-ressurect
set -g @resurrect-restore 'r'

# Highlight with stronger border
set-option -g pane-border-style fg=grey
set-option -g pane-active-border-style fg=colour199

# Scrollback - open buffer in neovim in tmp file
bind e run-shell "tmux capture-pane -S -; tmux save-buffer /tmp/tmux-scrollback.$$; tmux new-window \"nvim +\\$ /tmp/tmux-scrollback.$$ +'autocmd VimLeave * !rm /tmp/tmux-scrollback.$$'\""

# More scrollback options
setw -g mode-keys vi
set-option -g history-limit 100000

# Starts tmux plugin manager (TPM)
run '~/.tmux/plugins/tpm/tpm'

set-option -g default-command bash